

Seats
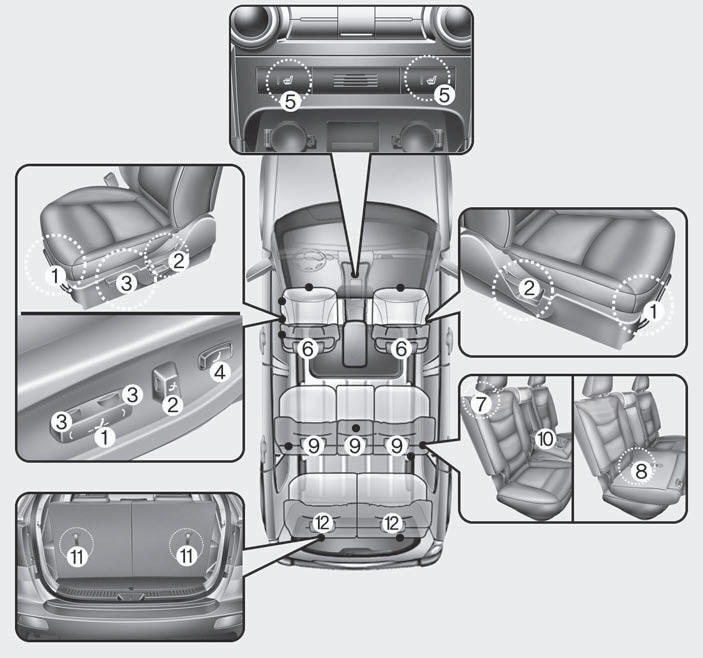
Front seat
(1) Forward and backward
(2) Seatback angle
(3) Seat cushion height (DriverŌĆÖs seat)
(4) Lumbar support (DriverŌĆÖs seat)*
(5) Seat heater*
(6) Headrest
2nd row seat
(7) Seatback angle and folding
(8) Double folding*
(9) Headrest
(10) Armrest
3rd row seat*
(11) Seatback folding
(12) Headrest
* if equipped
WARNING - Loose objects Loose objects in the driverŌĆÖs foot area could interfere with the operation of the foot pedals, possibly causing an accident. Do not place anything under the front seats.
WARNING - Uprighting
seat
When you return the seatback to its
upright position, hold the seatback
and return it slowly and be sure
there are no other occupants
around the seat. If the seatback is
returned without being held and
controlled, the back of the seat
could spring forward resulting in
accidental injury to a person struck
by the seatback.
WARNING - Driver responsibility
for passengers
Riding in a vehicle with the seatback
reclined could lead to serious
or fatal injury in an accident. If a
seat is reclined during an accident,
the occupantŌĆÖs hips may slide
under the lap portion of the seat
belt applying great force to the
unprotected abdomen. Serious or
fatal internal injuries could result.
The driver must advise the passenger to keep the seatback in an upright position whenever the vehicle is in motion.
WARNING - DriverŌĆÖs seat ŌĆó Never attempt to adjust the seat while the vehicle is moving. This could result in loss of control, and an accident causing death, serious injury, or property damage.
ŌĆó Do not allow anything to interfere with the normal position of the seatback. Storing items against a seatback or in any other way interfering with proper locking of a seatback could result in serious or fatal injury in a sudden stop or collision.
ŌĆó Always drive and ride with your seatback upright and the lap portion of the seat belt snug and low across the hips. This is the best position to protect you in case of an accident.
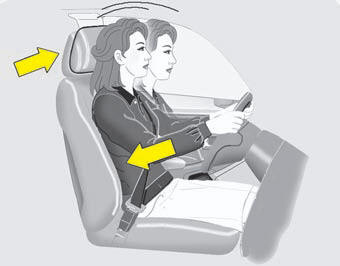
ŌĆó In order to avoid unnecessary and perhaps severe air bag injuries, always sit as far back as possible from the steering wheel while maintaining comfortable control of the vehicle.We recommend that your chest be at least 250 mm (10 inches) away from the steering wheel.
ŌĆó To avoid the possibility of burns, do not remove the carpet in the cargo area. Emission control devices beneath this floor generate high temperatures.
WARNING - Rear seatbacks ŌĆó The rear seatback must be securely latched. If not, passengers and objects could be thrown forward resulting in serious injury or death in the event of a sudden stop or collision.
ŌĆó Luggage and other cargo should be laid flat in the cargo area. If objects are large, heavy, or must be piled, they must be secured.
Under no circumstances should cargo be piled higher than the seatbacks. Failure to follow these warnings could result in serious injury or death in the event of a sudden stop, collision or rollover.
ŌĆó No passenger should ride in the cargo area or sit or lie on folded seatbacks while the vehicle is moving. All passengers must be properly seated in seats and restrained properly while riding ŌĆó When resetting the seatback to the upright position, make sure it is securely latched by pushing it forward and backwards.
ŌĆó To avoid the possibility of burns, do not remove the carpet in the cargo area. Emission control devices beneath this floor generate high temperatures.
WARNING
After adjusting the seat, always
check that it is securely locked into
place by attempting to move the
seat forward or backward without
using the lock release lever.
Sudden or unexpected movement of the driver's seat could cause you to lose control of the vehicle resulting in an accident.
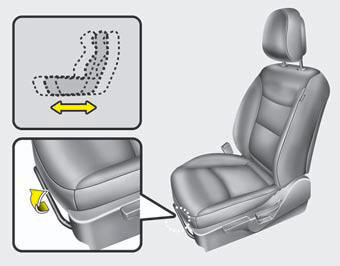
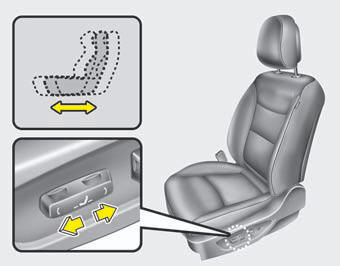
Front seat adjustment - manual
Forward and backward
To move the seat forward or backward:
1. Pull the seat slide adjustment lever up
and hold it.
2. Slide the seat to the position you desire.
3. Release the lever and make sure the seat is locked in place.
Adjust the seat before driving, and make sure the seat is locked securely by trying to move forward and backward without using the lever. If the seat moves, it is not locked properly.
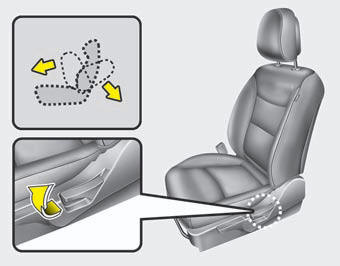
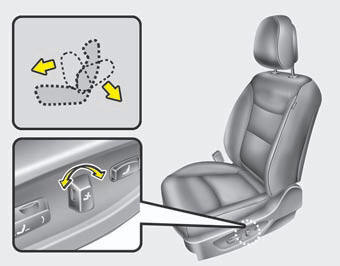
Seatback angle
To recline the seatback:
1. Lean forward slightly and lift up the
seatback recline lever.
2. Carefully lean back on the seat and adjust the seatback of the seat to the position you desire.
3. Release the lever and make sure the seatback is locked in place. (The lever MUST return to its original position for the seatback to lock.)
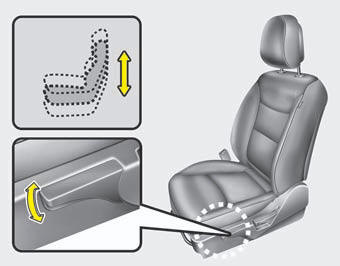
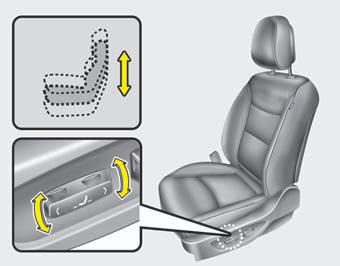
Seat height (for driverŌĆÖs seat) To change the height of the seat, push the lever upwards or downwards.
ŌĆó To lower the seat cushion, push down the lever several times.
ŌĆó To raise the seat cushion, pull up the lever several times.
Front seat adjustment - power
(if equipped)
The front seat can be adjusted by using
the control switches located on the outside
of the seat cushion. Before driving,
adjust the seat to the proper position so
as to easily control the steering wheel,
pedals and switches on the instrument
panel.
WARNING
The power seat is operable with the
ignition OFF.
Therefore, children should never be left unattended in the vehicle.
CAUTION
ŌĆó The power seat is driven by an
electric motor. Stop operating
once the adjustment is completed.
Excessive operation may
damage the electrical equipment.
ŌĆó When in operation, the power seat consumes a large amount of electrical power. To prevent unnecessary charging system drain, donŌĆÖt adjust the power seat longer than necessary while the engine is not running.
ŌĆó Do not operate two or more power seat control switches at the same time. Doing so may result in power seat motor or electrical component malfunction.
Forward and backward
Push the control switch forward or backward
to move the seat to the desired
position. Release the switch once the
seat reaches the desired position.
Seatback angle
Push the control switch forward or backward
to move the seatback to the desired
angle. Release the switch once the seat
reaches the desired position.
Seat height (for driverŌĆÖs seat) Pull the front portion of the control switch up to raise or down to lower the front part of the seat cushion. Pull the rear portion of the control switch up to raise or down to lower the rear part of the seat cushion.
Release the switch once the seat reaches the desired position.
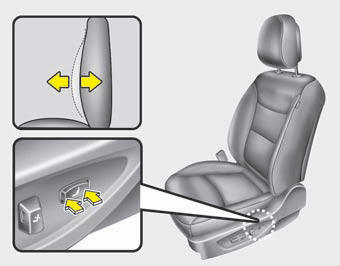
Lumbar support (for driverŌĆÖs seat) The lumbar support can be adjusted by pressing the button.
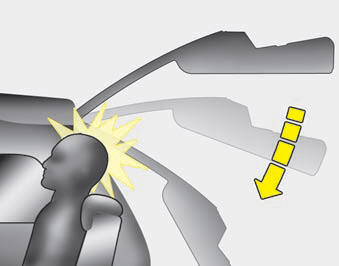
Headrest
The driver's and front passenger's seats
are equipped with a headrest for the
occupant's safety and comfort.
The headrest not only provides comfort for the driver and front passenger, but also helps protect the head and neck in the event of a rear collision.
WARNING
ŌĆó For maximum effectiveness in
case of an accident, the headrest
should be adjusted so the middle
of the headrest is at the same
height of the center of gravity of
an occupant's head. Generally,
the center of gravity of most people's
head is similar with the
height of the top of their eyes.
Also, adjust the headrest as close to your head as possible. For this reason, the use of a cushion that holds the body away from the seatback is not recommended.
ŌĆó Do not operate the vehicle with the headrests removed. Severe injury to the occupants may occur in the event of an accident.
Headrests may provide protection against neck injuries when properly adjusted.
ŌĆó Do not adjust the headrest position of the driverŌĆÖs seat while the vehicle is in motion.
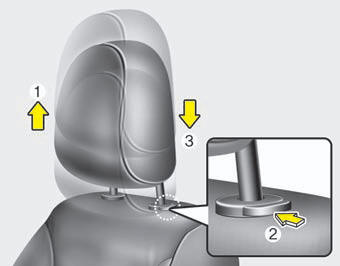
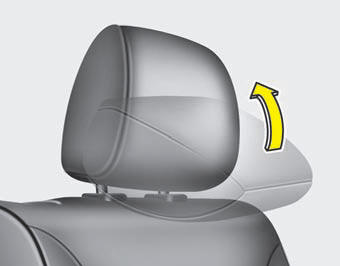
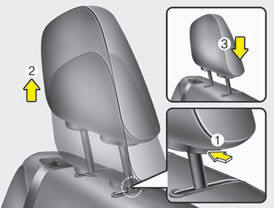
Adjusting the height up and down To raise the headrest, pull it up to the desired position (1). To lower the headrest, push and hold the release button (2) on the headrest support and lower the headrest to the desired position (3).
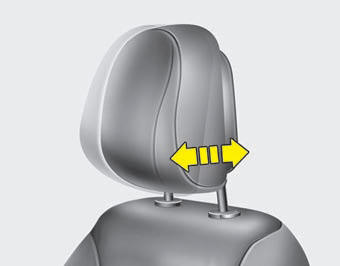
Adjusting the angle (if equipped) The headrest angle may be adjusted by pulling or pushing the lower part of the headrest.
Adjust the headrest so that it properly supports the head and neck.
CAUTION
Excessive pulling or pushing may
damage the headrest.
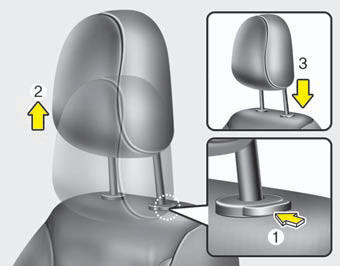
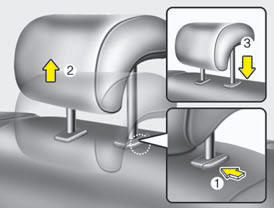
Removal (except active headrest) To remove the headrest, raise it as far as it can go then press the release button (1) while pulling the headrest up (2).
To reinstall the headrest, put the headrest poles (3) into the holes while pressing the release button (1). Then adjust it to the appropriate height.
WARNING
Make sure the headrest locks in
position after adjusting it to properly
protect the occupants.
Active headrest (if equipped) The active headrest is designed to move forward and upward during a rear impact.
This helps prevent the driver's and front passengerŌĆÖs heads from moving backward and thus helps minimize neck injuries.
For your safety, the active headrest canŌĆÖt be removed. If there is any problem with the active headrest, take your vehicle to an authorized KIA dealer and have the system checked.
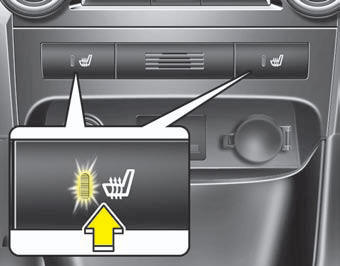
Seat heater (if equipped) The seat heater is provided to warm the front seats during cold weather. With the ignition switch in the ON position, push either of the switches to warm the driver's seat or the front passenger's seat.
During mild weather or under conditions where the operation of the seat heater is not needed, keep the switches in the OFF position.
NOTICE
With the seat heater switch in the ON
position, the heating system in the seat
turns off or on automatically depending
on the seat temperature.
CAUTION
ŌĆó When cleaning the seats, do not
use an organic solvent such as
thinner, benzene, alcohol and
gasoline. Doing so may damage
the surface of the heater or seats.
ŌĆó To prevent overheating the seat heater, do not place blankets, cushions or seat covers on the seats while the seat heater is in operation.
ŌĆó Do not place heavy or sharp objects on seats equipped with seat heaters. Damage to the seat warming components could occur.
WARNING - Seat heater
burns
Passengers should use extreme
caution when using seat heaters
due to the possibility of excess
heating or burns. In particular, the
driver must exercise extreme care
for the following types of passengers:
1. Infants, children, elderly or disabled
persons, or hospital outpatients
2. Persons with sensitive skin or
those that burn easily
3. Fatigued individuals
4. Intoxicated individuals
5. Individuals taking medication
that can cause drowsiness,
sleepiness or impairment (sleeping
pills, cold tablets, etc.)
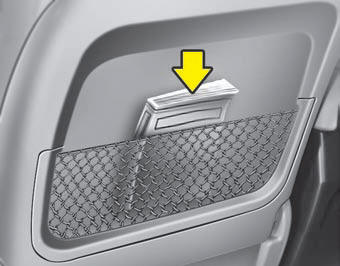
Seatback pocket (if equipped)
WARNING - Seatback
pockets
Do not put heavy or sharp objects
in the seatback pockets. In an accident
they could come loose from
the pocket and injure vehicle occupants.
WARNING
For proper operation of the occupant
classification system:
ŌĆó Do not place any items cumulatively
weighing over 1 kg (2.2 lbs)
in the seatback pocket or on the
seat.
ŌĆó Do not hang onto the front passenger seat.

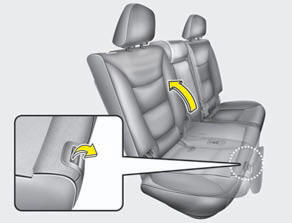
Rear seat adjustment
Seatback angle (2nd row seat)
To recline the seatback:
1. Pull up the seatback recline lever.
2. Hold the lever and adjust the seatback of the seat to the position you desire.
3. Release the lever and make sure the
seatback is locked in place. (The lever
MUST return to its original position for
the seatback to lock.)
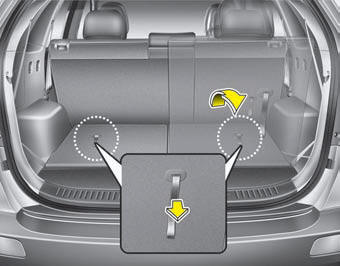
Folding the rear seat
The rear seatbacks can be folded to facilitate
carrying long items or to increase
the luggage capacity of the vehicle.
WARNING
The purpose of the fold-down rear
seatbacks is to allow you to carry
longer objects that could not be
accommodated in the cargo area.
Never allow passengers sit on top of the folded down seatback while the vehicle is moving. This is not a proper seating position and no seat belts are available for use.
Ignoring this warning could result in serious injury or death in case of an accident or sudden stop.
Objects carried on the folded down seatback should not extend higher than the top of the front seatbacks.
Doing this could allow cargo to slide forward and cause injury or damage during sudden stops.
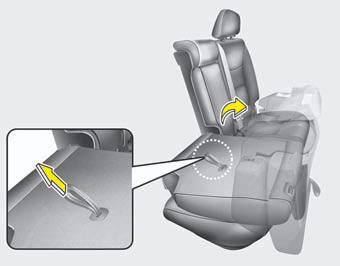
2nd row seat
1. Insert the rear seat belt buckle in the
pocket (if equipped) between the rear
seatback and cushion, and insert the
rear seat belt webbing in the guide to
prevent the seat belt from being damaged.
2. Set the front seatback to the upright position and if necessary, slide the front seat forward.
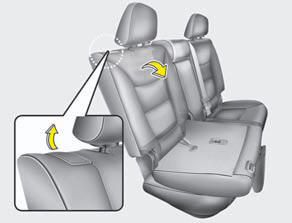
3.Lower the rear headrests to the lowest position.
4.Pull on the seatback folding lever, then fold the seat toward the front of the vehicle. When you return the seatback to its upright position, always be sure it has locked into position by pushing on the top of the seatback.
5. Also, unfold the headrest manually.
6. Return the rear seat belt to the proper position.
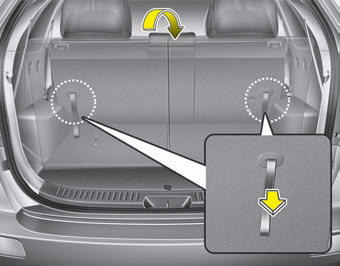
Double folding
(2nd row right seat, if equipped)
Pull the double folding strap on the right
rear seatback, then pull up the rear of the
portion seat cushion toward the front of
the vehicle. When you return the seat
cushion to its original position, always be
sure it has locked into position by pulling
the rear portion of the seat cushion.
WARNING
When you return the rear seatback
to its upright position after being
folded down:
Be careful not to damage the seat
belt webbing or buckle. Do not
allow the seat belt webbing or
buckle to get caught or pinched in
the rear seat. Ensure that the seatback
is completely locked into its
upright position by pushing on the
top of the seatback. Otherwise, in
an accident or sudden stop, the
seat could fold down and allow
cargo to enter the passenger compartment,
which could result in
serious injury or death.
WARNING - Uprighting
seat
When you return the seatback to its
upright position, hold the seatback
and return it slowly and be sure
there are no other occupants
around the seat. If the seatback is
returned without being held and
controlled, the back of the seat
could move forward or backward
resulting in accidental injury to a
OXM039023N person struck by the seatback.
3rd row seat (if equipped) 1. Insert the rear seat belt buckle in the pocket between the rear seatback and cushion, and insert the rear seat belt webbing in the guide to prevent the seat belt from being damaged.
2. Set the 2nd row seatback to the upright position.
3.Pull on the seatback folding strap, then fold the seat toward the front of the vehicle.
4. To use the rear seat, lift and pull the seatback backward by pulling on the folding strap. Pull the seatback firmly until it clicks into place. Make sure the seatback is locked in place.
5. Unfold the headrest manually.
6. Return the rear seat belt to the proper position.
WARNING
When you return the rear seatback
to its upright position after being
folded down:
Be careful not to damage the seat
belt webbing or buckle. Do not
allow the seat belt webbing or
buckle to get caught or pinched in
the rear seat. Ensure that the seatback
is completely locked into its
upright position by pushing on the
top of the seatback. Otherwise, in
an accident or sudden stop, the
seat could fold down and allow
cargo to enter the passenger compartment,
which could result in
serious injury or death.
WARNING - 3rd row seat 3rd row occupants should always remain in the center of the seat cushion so the occupants head is protected by the headrest.
If not, the tailgate may hit the occupant's
head, which could cause
injury.
CAUTION - Damaging rear
seat belt buckles
When you fold the rear (2nd and/or
3rd row) seatback, insert the buckle
in the pocket between the rear seatback
and cushion. Doing so can
prevent the buckle from being damaged
by the rear seatback.
CAUTION - Rear seat belts When returning the rear (2nd and/or 3rd row) seatbacks to the upright position, remember to return the rear shoulder belts to their proper position. Routing the seat belt webbing through the rear seat belt guides will help keep the belts from being trapped behind or under the seats.
WARNING - Cargo
Cargo should always be secured to
prevent it from being thrown about
the vehicle in a collision and causing
injury to the vehicle occupants.
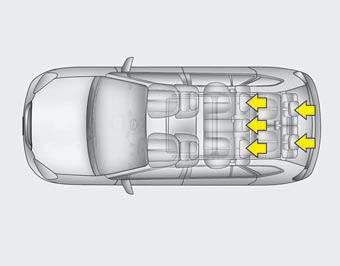
Do not place objects in the rear (2nd and/or 3rd row) seats, since they cannot be properly secured and may hit the front seat occupants in a collision.
WARNING - Cargo loading Make sure the engine is off, the automatic transaxle is in P (Park) and the parking brake is securely applied whenever loading or unloading cargo. Failure to take these steps may allow the vehicle to move if the shift lever is inadvertently moved to another position.
Headrest
The rear seat(s) is equipped with headrests
in all the seating positions for the
occupant's safety and comfort.
The headrest not only provides comfort for passengers, but also helps protect the head and neck in the event of a collision.
WARNING
ŌĆó For maximum effectiveness in
case of an accident, the 2nd row
headrest should be adjusted so
the middle of the headrest is at
the same height of the center of
gravity of an occupant's head.
Generally, the center of gravity of most people's head is level to the height of the top of their eyes.
ŌĆó Also adjust the headrest as close to your head as possible. For this reason, the use of a cushion that holds the body away from the seatback is not recommended.
ŌĆó Do not operate the vehicle with the headrests removed. Severe injury to an occupant may occur in the event of an accident.
Headrests may provide protection against severe neck injuries when properly adjusted.
ŌĆó After adjusting or reinstalling the headrest, always make sure the headrest locks in the upright position to properly protect the occupants.
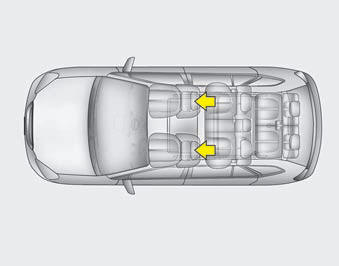
2nd row headrest
Adjusting the height up and down
To raise the headrest, push and hold the
release button (1) while pulling it up to
the desired position (2). To lower the
headrest, push and hold the release button
(1) on the headrest support and
lower the headrest to the desired position
(3).
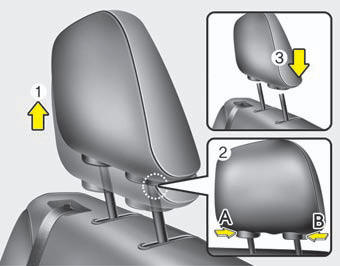
Removal
Outer
To remove the headrest,
1. Raise it as far as it can go.
2. Insert the small thin bar into the release hole (A).
3. While pressing the release hole (A), press the button (B), then pull the headrest up.
To reinstall the headrest, insert the headrest holes (3) into the poles and press the headrest down. Then adjust it to the appropriate height and make sure the headrest is locked in place.
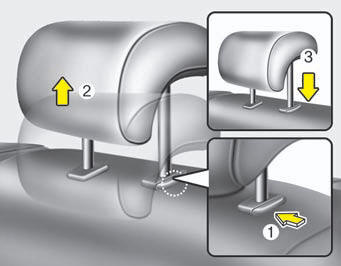
Center
To remove the headrest, raise it as far as
it can go then press the release button
while pulling the headrest up (2).
To reinstall the headrest, put the headrest poles (3) into the holes while pessing the release button (1). Then adjust it to the appropriate height.

3rd row headrest (if equipped) The headrest will fold down automatically when the seatback folding.
Always be sure the headrest has locked into position after you return the seatback.
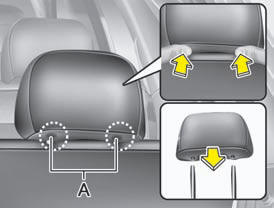
Removal
To remove the headrest, press the both
release buttons (A) inside the headrest
while pulling the headrest up.
To reinstall the headrest, put the headrest holes into the poles and press the headrest down. Then, make sure the headrest is locked in place.
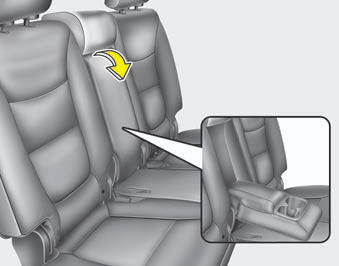
Armrest (2nd row seat) To use the armrest, pull it forward from the seatback.
See also:
Manual transaxle
Manual transaxle operation
The manual transaxle has five forward
gears.
Press the clutch pedal down fully while
shifting, then release it slowly.
The gearshift lever must be returned to
the ne ...
Driving your vehicle
Ignition switch
Starting the engine
Manual transaxle
Automatic transaxle
Four wheel drive (4WD)
Brake system
Steering wheel
Cruise control system
Electronic stability control
Instrument clust ...
Vehicle handling instructions
As with other vehicles of this type, failure
to operate this vehicle correctly may
result in loss of control, an accident or
vehicle rollover.
Specific design characteristics (higher
ground clear ...