

Homelink wireless control system
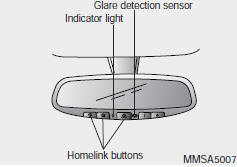
Your new mirror comes with an integrated
HomeLink Universal
Transceiver, which allows you to program
the mirror to activate your
garage door(s), estate gate, home
lighting, etc. The mirror actually
learns the codes from your various
existing transmitters.
CAUTION
• When programming the
HomeLink® Wireless Control
System, you may be operating
a garage door or gate operator.
Make sure that people and objects are out of the way of the moving door or gate to prevent potential harm or damage.
• Do not use HomeLink with any
garage door opener that lacks
the safety stop and reverse
feature as required by federal
safety standards. (This
includes any garage door
opener model manufactured
before April 1, 1982.) A garage
door opener which cannot
detect an object, signaling the
door to stop and reverse, does
not meet current federal safety
standards. Using a garage
door opener without these
features increases risk of serious
injury or death. For more
information, call 1-800-355-
3515 or on the internet at
www.homelink.com.
• Retain the original transmitter for future programming procedures (i.e., new vehicle purchase).
It is also suggested
that upon the sale of the vehicle,
the programmed
HomeLink buttons be erased
for security purposes (follow
step 1 in the “Programming”
portion of this text).
Programming
Your vehicle may require the ignition
switch to be turned to the ACC position
for programming and/or operation
of HomeLink. It is also recommended
that a new battery be
replaced in the hand-held transmitter
of the device being programmed to
HomeLink for quicker training and
accurate transmission of the radiofrequency.
Follow these steps to train your HomeLink mirror:
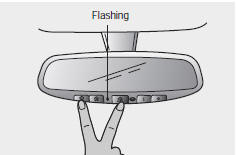
1. When programming the buttons for the first time, press and hold the left and center buttons ( , ) simultaniously until the indicator light begins to flash after approximately 20 seconds. (This procedure erases the factory-set default codes. Do Not perform this step to program additional handheld transmitters.)
NOTICE
For non rolling code garage door
openers, follow steps 2 - 3.
For rolling code garage door openers, follow steps 2 - 6.
For Canadian Programming, please follow the Canadian Programming section.
For help with determining whether your garage is non-rolling code or rolling code, please refer to the garage door openers owner’s manual or contact HomeLink customer service at 1-800-355-3515.
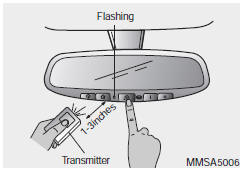
2. Press and hold the button on the HomeLink system you wish to train and the button on the transmitter while the transmitter is approximately 1 to 3 inches away from the mirror. Do not release the buttons until step 3 has been completed.
3. The HomeLink indicator light will flash, first slowly and then rapidly.
When the indicator light flashes rapidly, both buttons may be released. (The rapid flashing light indicates successful programming of the new frequency signal.)
NOTICE
Some gate operators and garage
door openers may require you to
replace step #3 with the “cycling”
procedure noted in the “Canadian
Programming” section of this document.
Rolling code programming
To train a garage door opener (or
other rolling code equipped devices)
with the rolling code feature, follow
these instructions after completing
the “Programming” portion of this
text. (A second person may make the
following training procedures quicker
& easier.)
4. Locate the “learn” or “smart” button
on the device’s motor head
unit. Exact location and color of
the button may vary by product
brand. If there is difficulty locating
the “learn” or “smart” button, reference
the device’s owner’s manual
or contact HomeLink at 1-800-
355-3515 or on the internet at
www.homelink.com.
5. Press and release the “learn” or “smart” button on the device’s motor head unit. You have 30 seconds to complete step number 6.
6. Return to the vehicle and firmly
press and release the programmed
HomeLink button up to
three times. The rolling code
equipped device should now recognize
the HomeLink signal and
activate when the HomeLink button
is pressed. The remaining two
buttons may now be programmed
if this has not previously been
done. Refer to the “Programming”
portion of this text.
Operating HomeLink
To operate, simply press the programmed
HomeLink button.
Activation will now occur for the trained product (garage door, security system, entry door lock, estate gate, or home or office lighting). For convenience, the hand-held transmitter of the device may also be used at any time. The HomeLink Wireless Controls System (once programmed) or the original hand-held transmitter may be used to activate the device (e.g. garage door, entry door lock, etc.). In the event that there are still programming difficulties, contact HomeLink at 1-800-355-3515 or on the internet at www.homelink.com.
Erasing programmed
HomeLink buttons
To erase the three programmed buttons
(individual buttons cannot be
erased):
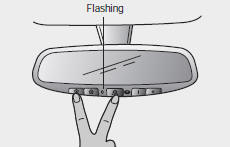
• Press and hold the left and center
buttons simultaniously, until the
indicator light begins to flash
(approximately 20 seconds).
Release both buttons. Do not hold for longer than 30 seconds.
HomeLink is now in the train (or learning) mode and can be programmed at any time.
Reprogramming a single
HomeLink button
To program a device to HomeLink
using a HomeLink button previously
trained, follow these steps:
1. Press and hold the desired
HomeLink button. Do NOT release
until step 4 has been completed.
2. When the indicator light begins to flash slowly (after 20 seconds), position the hand-held transmitter 1 to 3 inches away from the HomeLink surface.
3. Press and hold the hand-held transmitter button (or press and “cycle” - as described in “Canadian Programming” above).
4. The HomeLink indicator light will flash, first slowly and then rapidly.
When the indicator light begins to flash rapidly, release both buttons.
The previous device has now been erased and the new device can be activated by pushing the HomeLink button that has just been programmed.
This procedure will not
affect any other programmed
HomeLink buttons.
Gate operator programming &
canadian programming
During programming, your hand-held
transmitter may automatically stop
transmitting. Continue to press and
hold the HomeLink button (note
steps 2 through 4 in the
“Programming” portion of this text)
while you press and re-press
(“cycle”) your handheld transmitter
every two seconds until the frequency
signal has been learned. The indicator
light will flash slowly and then
rapidly after several seconds upon
successful training.
NOTICE
If programming a garage door opener
or gate, it is advised to unplug the
device during the “cycling” process
to prevent possible motor burn-up.
Accessories
If you would like additional information
on the HomeLink Wireless
Control System, HomeLink compatible
products, or to purchase other
accessories such as the HomeLink®
Lighting Package, please contact
HomeLink at 1-800-355-3515 or on
the internet at www.homelink.com.
This device complies with
Industry Canada Standard RSS-
210. Operation is subject to the following
two conditions:
1. This device may not cause interference,
and
2. This device must accept any interference,
including interference that
may cause undesired operation of
the device.
WARNING
Changes or modifications not
expressly approved by the party
responsible for compliance
could void the user’s authority
to operate the equipment.
IC: 4112104541A Gentex
MODEL/FCC ID: NZLSTDHL3
See also:
LUXURIOUS CLASS-EXCLUSIVE FEATURES
Upgrading to the Premium Package (as with our test car) adds items like wood
interior trim, heated rear seats, a driver’s memory seat with 4-way
adjustability, and class-exclusive features like ...
Defroster
The defroster heats the window to
remove frost, fog and thin ice from the
interior and exterior of the rear window,
while engine is running.
NOTICE
• To prevent damage to the conductors
bond ...
Emission control system
The emission control system of your
vehicle is covered by a written limited
warranty. Please see the warranty information
contained in the Warranty &
Maintenance booklet in your vehicle.
Your ...